웹 프레임 워크
- 종류는 꽤 많다.
Django, web.py, CherryPy, web2py, Bottle, Flask, ...
- 일반적인 웹 프레임워크에서 제공하는 많은 기능이 게임 서버에선 대부분 불필요 하므로 마이크로 프레임워크가 좋다.
Flask, Bottle등
Flask
$ pip install Flaskfrom flask import Flask
app = Flask()
@app.rout('/')
def hello():
return 'Hello World!'
app.run(debug=True)
# http://localhost:8080/from flask import request, make_response
@app.route('/login')
def login():
user_id = request.args.get('user_id', None)
password = request.args.get('password', None)
if user_id is None or password is None:
return 'Login failed!'
resp = make_response('Login successed!')
resp.set_cookie('login_user', user_id)
return resp
# http://localhost:8080/login?user_id=foo&password&barfrom functools import wraps
def requires_login(func):
@wraps(func)
def wrapper(*args, **kwargs):
if request.cookies.get('login_user', None) is None:
return 'Not signed in!'
else:
return func(*args, **kwargs)
return wrapper
@app.route('/am_i_logged_in')
@requires_login
def login_check():
return 'Yes, you are.'
# http://localhost:8080/am_i_logged_in데이터 입출력
되도록 Json을 사용하고 보인이 필요하면 https를 사용하자
from flask import jsonify

@app.route('/leaderboard')
@requires_login
def get_leaderboard():
    return jsonify(names=['John Doe', 'Alan Smithee', 'Hong Gildong'], scores=[1500, 1200, 800], your_rank=7)

# http://localhost:8080/leaderboard
# >>> {'names': ['John Doe', 'Alan Smithee', 'Hong Gildong'], ...
예외처리
# 기본
from flask import abort

@app.route('/fail'):
def epic_fail():
    try:
        v = 1 / 0
        return 'divide one by zero is: ' + v
    except Exception, e:
        handle_exception(e)
        abort(500)

# 미들웨어 방법
class UserDefinedException(Exception): pass

class MyMiddleware(object):
    def __init__(self, app):
        self.app = app

    def __call__(self, environ, start_response):
        try:
            return self.app(environ, start_response)
        except UserDefindException, e:
            handle_exception(e)
        except Exception, e:
            lets_die()

app.wsgi_app = MyMiddleware(app.wsgi_app)
웹 서버 배포하기
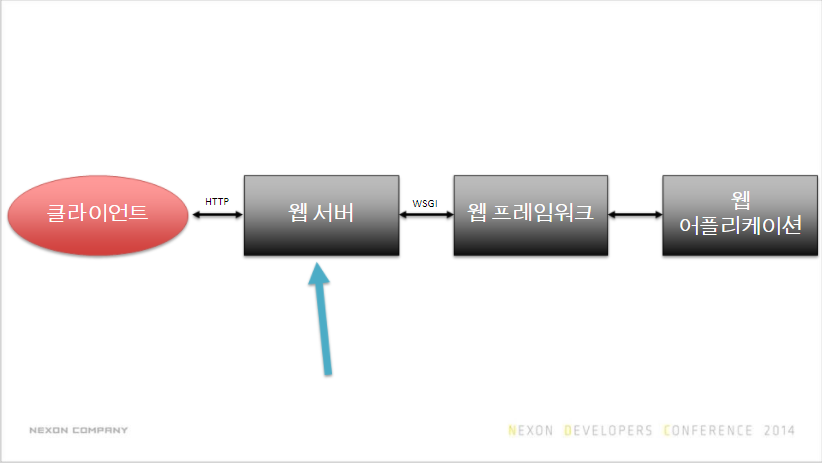
app.run()은 테스트용 웹 서버라 실제 환경에 돌리기 부적합
WSGI 인터페이스를 지원해야 한다
Apache에 mod_wsgi 모듈이 있다
개인적으로는 gunicorn 추천
$ pip install gunicorn파이썬 네트워킹 및 I/O
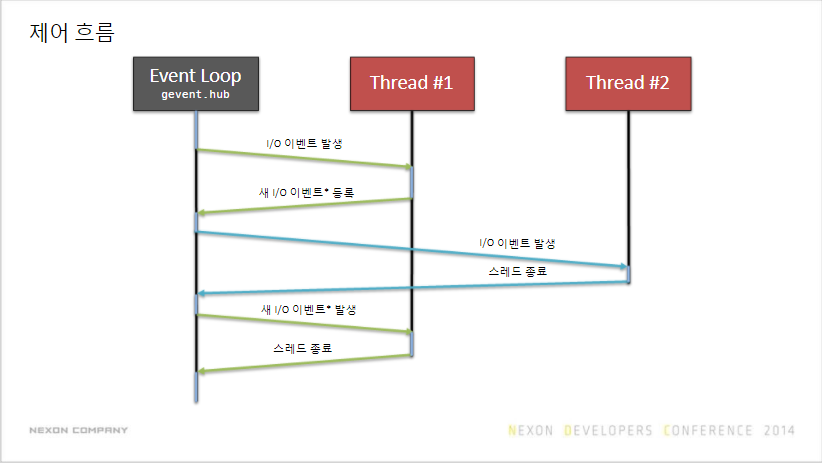
파이썬은 GIL(Global Interpreter Lock)때문에 스레딩 효율이 떨어진다. Single threaded asynchronous I/O를 추천
중앙 이벤트 루프(I/O 허브 역할)에 콜백을 붙이는 형태로 컨트롤 플로우가 구성된다.
var http = require('http');
var fs = require('fs');

http.createServer(function(req, res) {
    res.writeHead(200, {'Content-Type': 'text/plain'});
    fs.readFile('file.text', 'utf8', function(err, data) {
        res.end(data);
    });
}).listen(1337, '127.0.0.1');
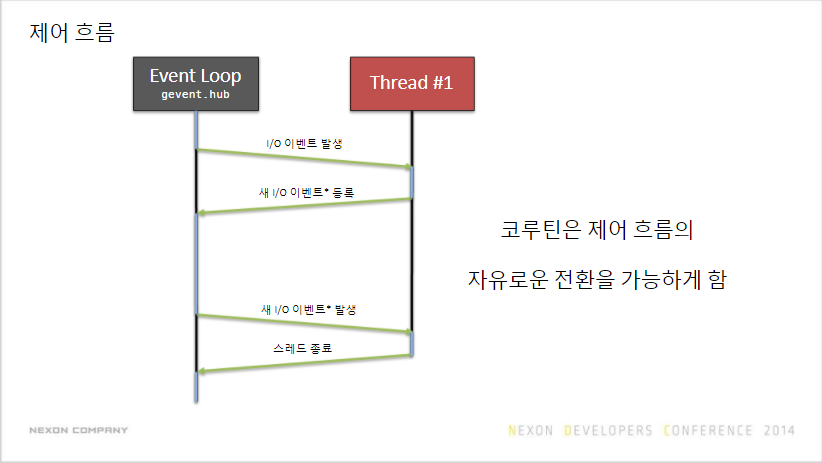
Gevent
코루틴 기반 네트워킹 라이브러리
동기 I/O 쓰듯 비동기 I/O 프로그래밍을 할 수 있다.
- 협력 스레딩 Cooperative threading
- 스케줄러가 없다
- 문맥 전환의 주체가 각 스레드다(작업이 없으면 리소스 반환)
- gevent는 I/O idle이 발생할 시 제어권을 넘긴다
$ pip install geventimport gevent
def func(id):
number = 0
while True:
print 'event id %d: %d' % (id, number)
number += 1
gevent.sleep(1)
jobs = [gevent.spawn(func, 1), gevent.spawn(func, 2)]
gevent.joinall(jobs)
Monkey patching
파이썬의 표준 라이브러리 함수들의 동작을 변경한다
Blocking I/O를 자동으로 Nonblocking으로 바꾼다
대부분의 파이썬 라이브러리와 호환된다
from gevent.monkey import patch_all
patch_all()

#표준 라이브러리
import urllib2

def read_url_contents(url):
    data = urllib2.urlopen(url).read()
    print 'URL contents of %s is bytes long' % (url, len(data))

job1 = gevent.spawn(read_url_contents, 'http://www.example.com')
job2 = gevent.spawn(read_url_contents, 'http://ndc.nexon.com')

gevent.joinall([job1, job2])

URL contents of http://ndc.nexon.com is 17827 bytes long
URL contents of http://www.example.com is 1270 bytes long
서버 확장하기
싱글 스레드 & 멀티 프로세스
인스턴스 확장을 통해 Scale out 구현
웹 서버의 경우 cpu 개수에 맞춰 프로세스 띄우기 가능한 gunicorn이 좋다
클라우드 서비스를 사용한다면 Automatic scaling
On-demand로 서버를 추가/제거
클라우드 API를 통해 전 과정 자동화 가능
적절한 metrics 전략 필요 - e.g 최근 5분간 모든 인스턴스 평균 CPU 사용량이 50% 초과시 Scale out
데이터 베이스
Nosql
Document-oriented Database
스키마가 없어서 저장되는 데이터의 형식 및 구조는 자유
일반적으로 하나의 Primary key로 구성되고 릴레이션이 없다
MongoDB
Ad hoc querying(쿼리 조건을 자유자재로)
JavaScript 지원
$ pip install pymongofrom pymongo import MongoClient
client = MongoClient('localhost', 27017)
db = client.test.db
collection = db.test_collection
collection.insert({'name':'Honggildong', 'phone':'+82-10-0000-0000'});
collection.insert({'name':'Kimchunhyang', 'phone':'+82-10-1111-1111'});
print collection.find_one({'name':'Honggildong'})
# {'name':'Honggildong', 'phone':'+82-10-0000-0000'}
NoSQL이 능사는 아니다
쌓이는 데이터가 관계성이 큰 경우
Query의 성능 이슈
레코드가 커질수록 생기는 Serialization/Deserialization 오버헤드
트랜잭션의 부재
RDBMS
파이썬에서는 표준화된 인터페이스(DBAPI) 제공
- SQLAlchemy - 파이썬 DB 라이브러리
- ORM(Object Relational Mapper)
언어와 DBMS 사이의 인터페이스
- SQL을 직접 짤 필요가 없다
# 데이터 정의
from sqlalchemy import *
form sqlalchemy.ext.declarative import declarative_base

Base = declarative_base()

class Record(Base):
    __tablename__ = 'phonebook'

    id = Column(Integer, primary_key=True)
    name = Column(String(255), nullable=False, index=True)
    number = Column(String(30), nullable=False)

    def __init(self, name, number):
        self.name = name
        self.number = number
# DB 접속 및 스키마 생성
from sqlalchemy.orm import sessionmaker
engine = create_engine('sqlite://test.db')
Session = sessionmaker(bind=engine)
# Create metadata (schema, ...)
Base.metadata.create_all(engine)# 데이터 삽입
r1 = Record('A', '123')
r2 = Record('B', '456')
# Insert into database
session = Session()
try:
session.add(r1)
session.add(r1)
session.commit()
except:
session.rollback()# 데이터 쿼리
# Selecting
for data in session.query(Record).all():
print data.name, data.number
# Selecting with where clause
for data in session.query(Record).filter(Record.name == 'A'):
print data.number
캐싱
실질적으로는 거대한 해시 테이블
데이터의 영속성은 보장되지 않음
Temporal locality가 큰 데이터의 경우 큰 효과
Memcached, Redis등
$ pip install redisimport redis
con = redis.StrictRedis(host='localhost', port=6379, db=0)
con.set('foo', 'bar')
print con.get('foo')
# bar워커
게임 서버에서는 특정 기능을 위한 별도의 워커가 필요
싱글 스레드 서버의 경우 CPU가 작업하는 동안 다른 작업이 Block 되기 때문에 CPU intensive task를 구현할 수 없다
작업을 위임하기 위한 dedicated worker를 구현하자
Celery
분산 작업 큐이고, 작업은 비동기로 수행한다
Celery와 게임서버간 통신을 위해 RabitMQ와 Redis를 지원한다
# my_tasks.py

from celery import Celery
app = Celery('tasks', broker='redis://localhost:6379/0')

@app.task
def a_very_huge_task(x, y):
    # Assume this is a huge task
    return x + y

$ celery -A my_tasks worker #run the worker
from my_tasks import a_very_huge_task
>>> result = a_very_huge_task.delay(1, 2)
>>> result.ready()
False
>>> result.ready() #After the task's done
True
>>> result.get()
3
# 워커에게 명령내리고 결과값 받기로깅
logging: 파이썬의 기본 로깅 라이브러리
import logging

logging.basicConfig()
logger = logging.getLogger('foo')

logger.debug('This is debug message')
logger.info('This is informational message')
logger.warning('You should take a look at this')
logger.error('Fix this RIGHT NOW')
logger.critical('Your revenue dropped by half')
Logbook
$ pip install logbook핸들러를 통한 확장 구현이 쉽다
(ciritical log는 메일 전송, 로그 서버로 로그 전송, 에러 로그를 Trello에 게시등)
배치(Deployment) 자동화
DVCS(Distributed Version Control System)를 쓰면 편해진다 (Git, Mercurial...)
프로덕션 환경에 소스 서버를 셋팅해야함
Hook 기능을 통해 반자동 배치 구현 가능
이벤트 발생시 임의의 명령 실행
원격 소스 서버에 push 발생시 서버가 알아서 업데이트 후 서버 재시작
Fabric: 시스템 관리 명령 및 배치 자동화
$ pip install fabricssh를 통한 자동화(소스 업데이트, 서버 재시작, 로그 삭제등)
출처: 박준규 / 넥슨 신규개발본부
https://ndcreplay.nexon.com/NDC2014/sessions/NDC2014_0041.htm
'NDC > Dev' 카테고리의 다른 글
| [NDC 2016] 구형맵에서는 어떻게 길을 찾아야 하나요? (0) | 2023.01.17 |
|---|---|
| [NDC 2016] 유니티, iOS에서 LINQ 사용하기 (0) | 2023.01.15 |
| [NDC 2014] 멀티쓰레드 프로그래밍이 왜이리 힘드나요? (0) | 2022.10.18 |
| [NDC2013] 테스트 꾸준히 잘하는 법 (0) | 2021.11.14 |
| [NDC2013] 라이브 프로젝트에서 C++로 테스트 주도 개발하기 (0) | 2021.11.13 |